
Step by Step Walkthrough
Retrieve Sequences
- Connect to the Home and Away Unity (right click on Unity Icon in the System Tray) by right clicking and selecting "Manage Connections"
- Username: grade1
- Password: <leave blank>
 Avid’s Unity Connection Manager
- Mount the required drives for the episodes you need. As a minimum you will need:
- Projects
- Stocks
- The blocks for the episodes you are processing
- One block after each block you have episodes for
- One or two blocks prior to each block you have episodes for
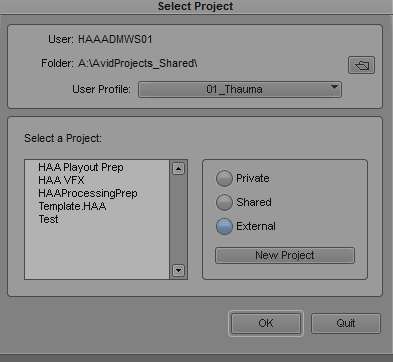
- Open Avid and open the HAA_ProcessPrep project from the A:\AvidProjects_Shared folder
Note: This can be done using Thaumaturgy's Open Avid script, with choosing the Processing Prep option - User Profile should be set to 01_Thauma - automatically set if opening via the Open Avid script
- Choose File / Open Bin and open the “Projects” drive:
- \\RWAV-UNITYFC\Projects\Thaumaturgy\+++LOCK_OFFS_FROM_JOHN.avb
Note: this bin name may change.
Note: You might have to look in Explorer to confirm which drive letter this is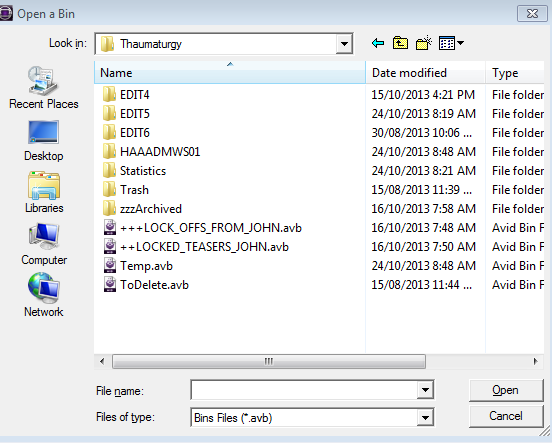
- Move all available episodes from John‘s bin to the 002.ToPrep bin in AVID.
Note: We have to spend as little time as possible in any bin attached to the Unity - we risk corrupting HAA‘s bins whilst they are open - Ensure all bins from the Unity are closed. The only open bins should be from the HAA_ProcessPrep project
Check all sequences tape names and video field
The following checks must be done on each sequence, one at a time.
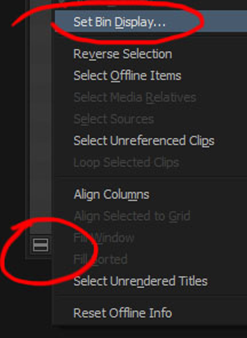
- Move the sequence to the 001.Working bin and change the bin to show Reference Clips using Set Bin Display / Show Reference Clips
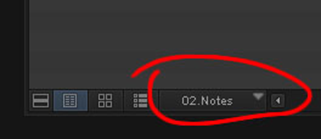
- Change the bin view to 02.Notes
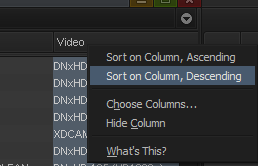
- Sort the bin by the video field, descending.
- Scroll down the bin, searching for any elements that are not of allowed formats.
Allowed Formats are:- XDCAM HD 50Mbits (1080p25)
- DNxHD 185 (1080p)
- DNxHD 185 (1080i) Stock Shots ONLY
- MXF 1:1 You must check these shots, they must be from alternate camera sources, such as iPhone or GoPro footage
- Search every video clip (those with something in the video field) for any clips missing a tape name.
If any clip is missing a tape name, then the sequence has failed checks. - If the sequence has failed checks, then return it to the locked bin it originated from and notify the Assistant Editor of the issue(s). If it has passed all tests, then it is ready for preparing for primary processing.
Archive Original Sequences
- Commit Multicam Edits on all the sequences to be processed. This step is normally performed by the Assistant Editor, but we must confirm this step. Select All (Ctrl-A), right click and select “Choose Multicam Edits”
A new copy of each sequence will be created with the suffix “.nogroups”.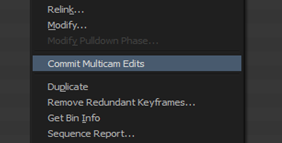
Note: If you don’t commit multicam edits, the ingest will take 2-3 times as long and use 2-3 times as much hard drive space. - Archive the original sequence (the one without the .nogroups suffix) in the corresponding block bin found in the zzOriginal folder. If no such bin exists - create one.
- Open each sequence into the record monitor (the right hand monitor). If AVID asks you to update effects, choose Yes. This will create another copy of the sequence that must also be archived in the folder mentioned in step 2.
Check episode structure and bake down effects
These checks must be performed one at a time on each sequence. You can also complete the next section before moving onto the next sequence if you desire.
- Move the sequence to check to the 001.ToWorking bin and load it into the record monitor (the right hand monitor).
- Select all tracks and with the entire sequence selected, click Clip / Remove Match Frame Edits
- Open the Markers List (sometimes called Locators) "Tools/Markers" and check the notes for anything relevant at this stage. This could be notes about duration, VFX or others.
- Check the general structure of the timeline. Every Home and Away episode should have the same structure, and a quick visual check should tell you if there is something seriously wrong with the episode structure.
- Are there 4 segments?
- Check the duration of the Opener - this can be found in the Ref 10. Ep Structure document.
- Each segment should have a countdown
- Segments 2, 3 & 4 should end with a 12 frame fade up from black
- Segment 4 should end with a 25 frame fade down to black (actual duration may vary - play the shot to confirm it looks acceptable)
- Between the recap and the first shot of the episode, should be a fade down, a snippet of black (usually 25 frames) and a fade up
- Check that all teasers are present and begin at the correct timecode
- Check that each teaser has a 2 second ident card appearing before the countdown that tells us what episode this is teasing and what position
- Check every effect on the sequence’s timeline. Effects need to be processed as follows:
- Effects that work as intended and can be safely ignored:
- Reposition
- Resize
- Timewarp that does not affect speed
- Effects that could cause confusion during grading must be noted in the Episode Status Sheet:
- Flip-Flop
- Flop
- 3D Warp
- Effects that impact colour should be removed completely:
- Colour Corrector
There are 3 kinds of colour corrector effects in Avid and they all look different.
- Colour Corrector
- Effects that damage timecode or have issues relinking into AVID after grading must be exported and reimported:
- Timewarp that affects speed
- Region Stabilise
- Fluid Motion
- Stabilise
- Picture-in-Picture
- Any other effects, if it isn’t listed here it could cause issues
- For notes on how to export and reimport effects please see 20a. Exporting Effects Shots
- Effects that work as intended and can be safely ignored:
- Check the timing of the segments
- The Assistant Editor should already have set the timing for the segments - if any changes need to be made during this step, please notify them
- Segments must start on the minute or half minute
- The countdown should start on 15 second or 45 seconds (10:09:15:00 or 10:09:45:00)
- The gap between segments must be no less than 30 seconds (not including the countdown)
You can check the gap between the episode and the countdown is at least 15 seconds, as we know the countdown must start at exactly 15 seconds prior to the episode.
- Check the markers list (Tools / Markers) so you don’t miss any effects or important notes.
Add any comments to the Episode Status sheet. - Check the openers.
The episode and teaser opener must match, as well as matching the list found in the pdf at Home and Away Openers List
Copy sequence into template
- Mark an In Point @ 10:00:00:00 and drag the sequence to the source monitor (the left one)
- Determine which template to use - there are two, one for an episode with a Combo Teaser, one with only a single teaser.
- Duplicate the relevant template sequence from the HAA Episode Elements bin and drag the new version into the 001.Working bin
Be careful not to destroy the original template! - Check the track V3 is NOT selected in the timeline window. You don’t want to overwrite the timecode track. All other vision and audio tracks should be selected.
- With the Template in the record monitor (right side) and the episode in the source monitor. Click Overwrite.
 Avid’s overwrite button
The Template should now contain the full episode in the correct position (the first frame of episode vision should be at 10:00:00)
Avid’s overwrite button
The Template should now contain the full episode in the correct position (the first frame of episode vision should be at 10:00:00)
- On the original sequence, set an in point at 10:25:00:00, then an in point of 10:26:30:00 on the new sequence and perform an overwrite. This copy of the teaser should have no countdown or card.
- If the episode has a Teaser B, open the original sequence and set an in point at the first frame of the card, and overwrite it to the new sequence
from the template at the corresponding timecode. Repeat this for the Clean version of Teaser B. Clean Versions should not contain a countdown or ident card.
All timings for episode elements can be found on the Episode Structure Reference Page
- Check the timecode and duration of the Opener again. This confirms that the sequence has been inserted to the correct position.
Name Sequence and place it into the PACMAN ToProcess bin
Each PACMAN portfolio has a required naming convention.
They all follow the format of <client>.<episode number>.<sequence type>.<purpose>
- Measure the episode duration.
- Select Tools / Calculators
- Set the calculator format to 25 FPS
- For each segment, set an In Point on the first frame of vision, and an Out Point on the last frame and add the durations in the calculator - do not include the coutdown in the segment.
- The duration will appear above the source/record monitors. In this case the duration is 06:08:17.

- Once all four segments have been added together, add 30:12 for the teaser. We know the teaser will always be this duration.
- Each Home and Away episode should have a duration between:
21:15:11 and 21:30:11
If the duration falls outside of this range, check with the Assistant Editor or Post Production Supervisor.
Extended or short episodes are allowed with special consideration.
- Construct the Episode’s Ident using Avid’s title tool.
- There are two idents in the template - one relates to episodes with a separate international teaser and the other relates to episodes that only have a single teaser.
Delete the one that does not apply to this episode. - Enter Effect Mode and click Edit Title
 Avid’s Effect Mode Button
- CAT# can be found in the Episode Status Sheet - it is unique to each episode
- Episode# must match the sequence you are working on
- Duration will come from the calculations you made above. If it is an extended episode - append **EXTENDED** after the duration.
- Lock Date should be set to today’s date.
- Vision should not change
- Audio tracks 1&2 should not change. The other tracks should be listed as “3-<highest track> Temp M&E where available + additional dialogue
- If the episode has an International Teaser, (usually a Wednesday episode) the Ident should indicate the timecode for each version of the teaser.
- This is the Ident for ingest only. The Ident for playout of the Master is slightly different (the Audio tracks will change)
It is important to remember, we are constructing this ident for the episode, not only the elements we have - if there is going to be a combo teaser but we don't have it yet, still include these items.
- There are two idents in the template - one relates to episodes with a separate international teaser and the other relates to episodes that only have a single teaser.
- Add the end of segment shots to their corresponding timecode
- For each segment, select the last shot and copy it
- Go to the corresponding timecode (found in the Ref 10. Episode Structure document.)
- Paste the shot overwriting the card that is in place in the template.
- Extend the shots by a minimum of 80 frames (if there is not enough footage, then leave it as extended as possible)
- Clean up the 001.Working bin.
Any new clips <pre-rendered effects, titles> cannot be deleted at this time. Instead, move them to the ToDelete bin. - For each sequence, use the following naming conventions:
- If the sequence is for an episode, duplicate the sequence & name them:
- HAA.<episode number>.EpADRM.Ingest
- If the sequence is for a teaser, name it:
- HAA.<episode number>_<teaser type>.Teaser.Ingest
The following teaser types are acceptable:- Int for an international teaser
- Loc for a local teaser
- HAA.<episode number>_<teaser type>.Teaser.Ingest
- If the sequence is for an episode, duplicate the sequence & name them:
- EpADRM sequences require a view track to be set on ANY track, it does not matter which. They required no further configuration.
- For each Teaser Sequence:
- Set the In Point at the first frame of the Opener
- Set the Out Point on the last frame of vision
- Check the selected duration is exactly 30:12
- Check the sequence duration is exactly 47:12
- Colour the sequences as follows:
- EpADRM - Orange
- Teaser - Red
- Place the sequence(s) in PACMAN’s ToProcess bin.
The bin should be available to you through the Other Bins folder.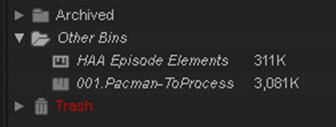 If it isn't you can open it from
<Project Drive>\DeadlineRepository6\THAPacman\ProjectFiles\
CommonProjects\AvidProjects_Restricted\Pacman_ToProcess\001.Pacman-ToProcess.avb