
Step by Step Walkthrough
Relink Media in AVID
- You now need to get the sequence and make sure it looks at the correct media. Open Thaumaturgy's Avid, with the selection of HAA Playout Prep
Note: this could also be found at <Project01>:/AvidProjects_Shared/HAAPlayoutPrep/ - Open the AAFImported bin found in the "Other Bins" folder and move the sequences that correspond to the episodes you wish to Master to the 000.ToPrep bin.
- If there was a separate teaser, import the teaser's ToGrade aaf and overwrite it into the episode sequence.
- Drag one sequence to the 001.Working bin, and then open it in the record monitor (right monitor). This sequence is looking at the original media, we need to relink it to the graded material.
- If there are any audio, timecode or ADR tracks, delete them.
- In Windows Explorer, navigate to the media folder of the graded footage (<Playout>:/Avid MediaFiles/MXF/<episode number>).
You need to drag the .mdb file located in this folder to the 002.Working bin. If you cannot locate the .mdb file, ensure Avid has indexed the folder.
Avid will only index folders if the folder name is a number and the folder exists in the "AvidMediaFile\MXF\" folder. The media index is contained in the file msmMMOM.mdb
- Select all items in the 001.Working bin, right click and select Relink.
The relink dialogue box will appear.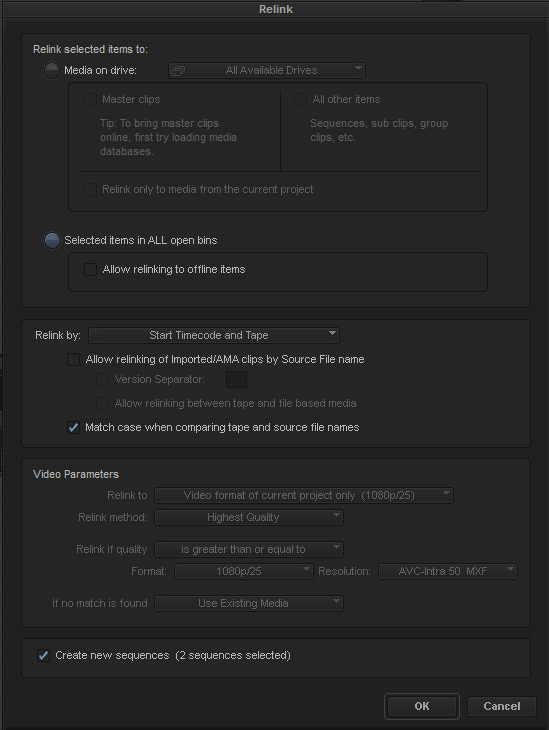 The image above shows the required settings, "Selected Items in ALL open bins" and "Create new sequences" with all tracks selected are the most important settings - other settings will take time and provide unreliable results.
- Without changing your selection - Select Clip / Unlock Bin Selection and then delete all selected items in the 001.Working bin.
MAKE SURE YOU DO NOT DELETE MEDIA WHEN DOING THIS.
- The only item left in the Working bin should be the episode sequence with .Relinked appended to the name.
- Check that all the media in the .Relinked sequence is pointing to the <Playout> drive (L: at Redfern).
Click Set Bin Display / Show Reference Clips
Check the Drive Column
Turn off Reference Clips when you are done. - If any media points to any other drive, you cannot play out this episode. Worst case scenario, locate the clips on the timeline and render them as QT's from Resolve, and place them manually. This is the last resort - most issues are fixable without doing this
- To easily identify where these clips are on the timeline, colour them in the bin and scan the timeline.
- Sometimes these clips aren't used (they are on V1 with a new clip on V2, or they are VFX shots), you can safely remove these shots from the timeline
- You now need to remove any errant colour adapters from the timeline. To do this, simply right-click on the sequence in the bin and Select Refresh Sequence / Color Adapters
Get the Credits into AVID
The sequence now points to graded media, it is time to add in the remaining missing elements - credits, etc. See 100b. Rendering Credits from PACMAN for instructions if the credits don't yet exist.
- Open the Credits bin.
- If the credits for the episode you are playing out are not in the bin, select File / Import
- Click Options and check the File Pixel to Video Mapping is set to Computer RGB (0-255)
- Check that the Video and Audio drive are set to the <Playout> drive.
- Check that Video Resolution is set to DNxHD 185 MXF
- Navigate to the credits, and import and credit files that are not in the bin already.
- When the import is complete, colour all credits orange.
Video Mixdown the Teaser
- We require a Video Mixdown of the Teaser to place over the credits. To do this, set an In Point on the first frame of the teaser, and an Out Point on the last frame.
- Select Special / Video Mixdown
- Ensure that media being rendered is to the Playout drive as DNxHD 185 X MXF
Place the Credits & the Teaser in place.
- Drag this new clip (the teaser video mixdown) to the Source monitor (left one) and overwrite it at the local credits timecode to V2. It should be on top of the Local Credits Base on V1
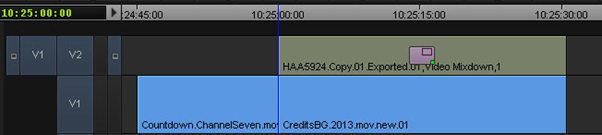
- From the Episode Elements bin, drag the effect Repo.Teaser2014 and place it on the Mixdown teaser you just added to the timeline. The teaser should now be repositioned so that the credit base is visible and the timeline should look like the image below:
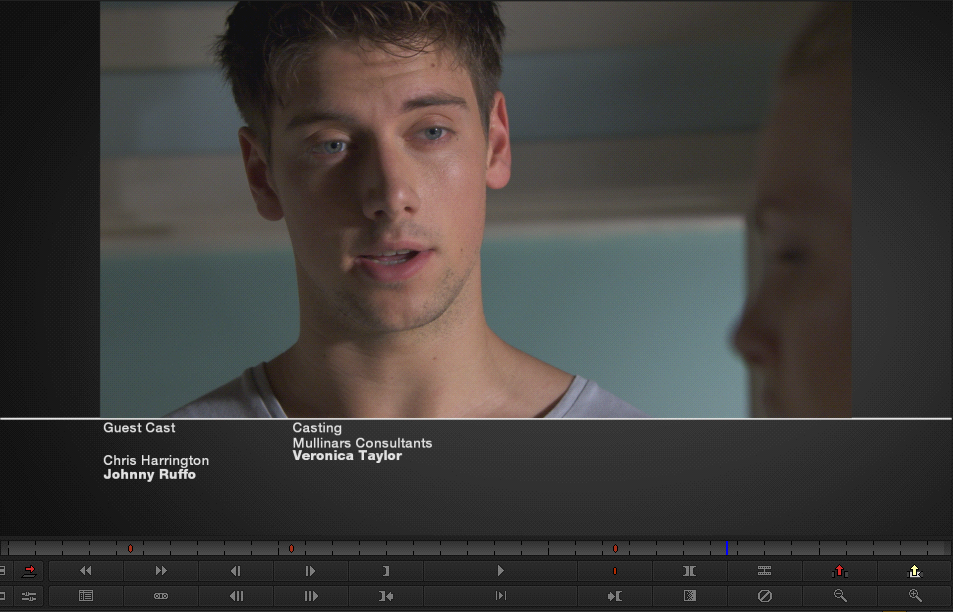
- From the Credits bin, drag the local credits to the Source Monitor and overwrite. The local credits should now be complete and look similar to the following:
- Check the first and last frames to ensure they are correct, as well as confirming the duration
- Overwrite the other required local and international credits at their corresponding timecodes. (See Timeline Structure for timecodes)
- Clean all of the bins of excess items by moving all created clips and credits to the ToDelete bin
Place the Recap's 235 Frame in place
- You must now add the 235 mask to the recap. Put the 235Frame_End clip from the EpisodeElements bin in the Source monitor. This is the animated clip.
- In the timeline window mark an Out Point at the first frame of the fade out on the recap.
- Perform an Overwrite to place the animated Letterbox clip on V2.

- Put the 235Frame_Start clip in the Source Monitor. This is the still image of the clip.
- Mark an Out point 1-frame before the start of the 235Frame_End clip (the one you just added to the timeline.) Mark an In Point at the start of the first clip after the opener.
- Perform an Overwrite to place the fixed Letterbox on clip on V2. If the Recap is very long you may need to add more than one copy of this clip to the timeline.
- Check the first frame of the letterbox. It must NOT appear over the Opener.
- Watch the entire recap - these shots are resized in Resolve and we need to check for sizing issues, especially the animated end!
At the end, the timeline should look similar to the following:

Construct the Master Ident
- Open the Ident text effect (select the clip on the timeline / Effect Mode / Edit Title)
- Change the Audio entry to read:
1&2 Stereo
3&4 M&E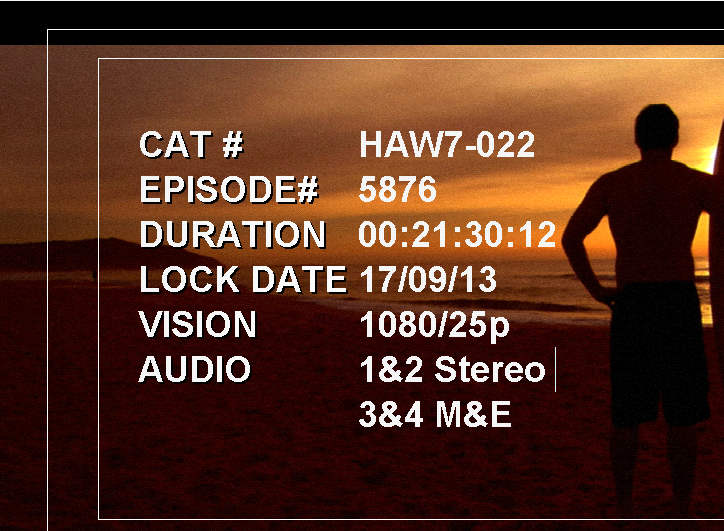
- Check the CAT# against the Master Tape label supplied by Channel 7. If there is a discrepency notify the Post Production Supervisor.
- If it is an episode with an International Teaser, check that they start at the timecodes indicated - they are occassionally required to move due to overlapping clips.
- Click Save. Exit the Title Tool
You also need to check the clip on the timeline successfully updated - AVID seems to not always update this.
Check the Status Sheet & Make Any Final Changes
- Check the Episode Status Sheet for any notes about this episode - resizing, VFX and edit checks are common checks at this stage.
- Do a double check of the episode:
- Check the structure
- Check the top vision track is selected
- Set the sequence colour to something appropriate to remind you that it is ready. (RED!)